For Clients
Homeowners, property owners, businesses, and property managers can start a conversation with PMC and get guided toward the right next step.
Start as a ClientProperty maintenance platform for the physical economy
PoweredbyPMC connects property owners, contractors, projects, reports, and field operations in one intelligent platform built for real work on real properties.
01
Request
02
Match
03
Report
Choose your path
Every road into PoweredbyPMC starts with a simple signal: property support, contractor network interest, or access to the right app.
Homeowners, property owners, businesses, and property managers can start a conversation with PMC and get guided toward the right next step.
Start as a ClientContractors, tradespeople, and service companies can join a network built around real work, clearer communication, and stronger project flow.
Join as a ContractorAccess the PMC client or provider app to manage project activity from the right side of the network.
Download the AppHomes, commercial buildings, managed sites, and recurring service needs.
Licensed and insured contractors connected to quality project flow.
Scheduling, visit windows, job movement, and field communication.
Completion records, updates, proof, and cleaner operational history.
The digital layer that keeps the built environment coordinated.
The old operating system
Property work is too important to live across missed calls, half-remembered scopes, lead-fee marketplaces, and scattered status updates.
Every project starts with fragments instead of a reliable operating record.
Owners, managers, crews, and admins chase the same status in different places.
Contractors lose margin before they even know whether the project is real.
Availability, visit windows, and change requests move slower than the field.
Clients do not know what happened, what is next, or who owns the next step.
Quotes, photos, reports, and decisions disappear after the work is done.
The hidden cost of maintenance is the time spent coordinating the maintenance.
Good contractors need operational support, not another inbox full of cold leads.
PMC organizes the field
PMC turns the messy middle of maintenance into a coordinated flow that clients, providers, and operators can actually trust.
01
A client enters the property need with structured context.
02
PMC routes the project to the right provider network.
03
Scope, price, timing, and service details become reviewable.
04
Work moves from intention to committed field time.
05
Crews, clients, and admins stay aligned while work is active.
06
Completion updates and service records become property intelligence.
07
The project closes with a cleaner operational trail.
08
Future work starts with history instead of guesswork.
Built for real work
The PMC brand world belongs to the field: gravel roads, commercial spaces, homes, contractors, crews, equipment, routes, and the digital command layer connecting it all.
Digital command layer
Built for the people who move dirt, fix buildings, maintain properties, and keep communities running.
Groundwork and property care
Dirt, gravel, trenching, and site prep
Heavy equipment inside the same operating picture
Facilities, offices, warehouses, and managed sites
Residential work with a professional project trail
Crews, routes, arrivals, and on-site progress
For Clients
Homeowners, businesses, and property managers can start a project, coordinate providers, track updates, and keep a cleaner record of what happened on the property.
Move the job out of texts and into a guided request with the right service context.
Work with a network built around licensed, insured, and supported professionals.
Keep quotes, scheduling, updates, and completion records tied to the property.
For Contractors
Providers get a serious operating layer for quality projects, client communication, quotes, scheduling, reports, and supported growth.
Join a network built to support quality opportunities, not charge for noise.
Admin coordination, client communication, and project structure help work move.
Use the app to manage quotes, client flow, payouts, and reputation signals.
Command Center
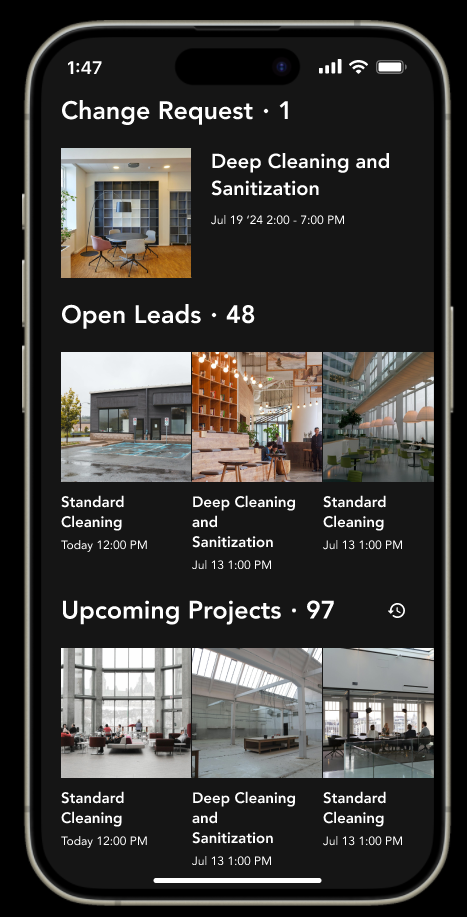
The PMC apps bring active projects, quotes, schedules, reports, notifications, provider profiles, and client records into one operational picture.
Open leads, upcoming work, cancellations, and change requests in one dashboard.
Visit windows, virtual visits, active work, and ongoing service coordination.
Provider workflow for quoting work and keeping business movement visible.
Status changes and client/provider touchpoints stay close to the work.
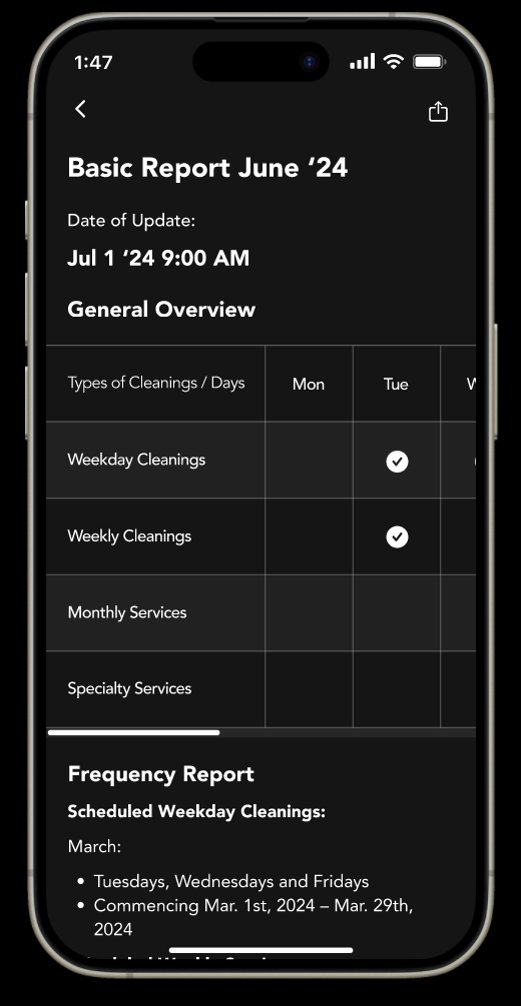
Service records, frequency reports, and completion context for property history.
Providers, properties, clients, and services become a connected operating layer.


Proof and trust
The site should speak with proof as the business adds more case studies and testimonials. For now, the trust layer should stay honest: service area, network standards, app presence, and the contractor-first model.
PMC's contractor trust story is rooted in professional standards and reliable work.
No lead-fee trap as the center of the relationship.
Built from real property work in the regional market PMC already serves.
The platform is designed around coordination, reporting, and follow-through.
The bigger vision
PoweredbyPMC is evolving from a better way to coordinate property work into a broader network for homes, buildings, contractors, materials, equipment, services, reports, and field operations.
Operating thesis
The built world needs a command layer as serious as the work itself.
PMC sits between property demand, provider capacity, project execution, and reporting. That position can become the connective infrastructure for the field economy.
Bring the field into command
Start a project, become a provider, or book a call to explore how PMC can organize the work behind the built world.